Showing posts with label machine stitch. Show all posts

Tuesday, 23 June 2015

Project Life 2015 ::: Week 13

Hello Tuesday!

The sun is shining and I'm feeling great. The breeze is still really fresh however I'm churning through a mountain of washing and getting that crossed off my list.

This year I challenged myself to do weekly project life as opposed to monthly or event based which I have done previously. And how's this going for me you ask. Well... really not to bad. No, I'm not currently scrapping week 24 however I have my photos printed and in pages up to week 17. And some of those weeks have even been finished *gasp*. You'll see some haphazard posts of those weeks soon.

Today though I'm celebrating my completed Week 13 layout. Woohoo!!! Go me!!! I used the May Cupcake Kit from A Piece of Cake Designs and the colours worked perfectly, just as I knew they would.


Left hand side


Script writing playing with the Higgins black ink from the kit. As well as die cuts, sequins, washi and Chickandiddy striped alphas from the kit.


I created the "Hello" card by machine stitching patterned papers, punching out the Hello die cut, highlighting words with a white pen and finishing off with a brad.
I had a larger story to document this week so pulled out the trusty old typewriter for some strip journalling


My other journalling solution this week is writing directly on photos then adding stickers, sequins and die cuts. 
I loved the Bella Boulevard 'Just add colour' stickers from the kit and added colour with distress markers.


Right hand side
  

Capturing the story on a two 3x4 cards with a fun title using the Bella Boulevard stickers and Chickandiddy striped alphas from the kit. I also used Marquee thickers from the kit extras section.


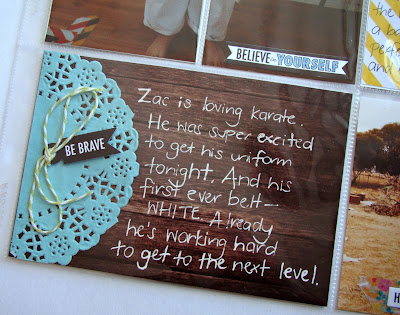
The kit came with 12 6x6 patterned papers from the 365 Chickandiddy crafts collection. This wood panelling one perfectly matched the wood floor in Zac's karate photo. I added another sticker from Bella Boulevard as well as some twine and one of the Doodlebug Designs doilies. 


Thanks so much for stopping by


Saturday, 21 March 2015

LO: Love Fun

For me, layouts come about for lots of different reasons. This layout is all about capturing Hannah's pure excitement on the flying fox for the FIRST time. 

The fishing playground (nick named by the kids because part of the play equipment is a boat) has undergone a huge revamp and a double flying fox has been added. Zac saw it and was instantly beside himself. He jumped onto the platform & pretty much didn't play on anything else.

Hannah, on the other hand, had never been on the flying fox before and she was too scared to try. Instead I pushed her a THOUSAND times on the tyre swing and then, when my arms were just too sore to go on, she wore out the slide.

Eventually, I was able to coax her over to the flying fox. And after what seemed like forever, but only really a few minutes, she decided to give it a go. Zac & I helped her get on the seat and then gently let her go. Off she went. Hair flying behind her and a grin bigger than the sun. LOVED IT is an understatement. She had so much fun and was so proud of herself for being brave in giving it a go.

And for all of that, she need her own layout.  


For this layout I have used lots from Amy Tangerine Stitched collection. I started with the Continued paper for the base, swiping some gesso on the left side just so my photo wouldn't be overwhelmed by all that gorgeous script. I highlighted a few of the script words with watercolour paints and then added some gelato colour to the gesso.

Next I layered pieces from the other patterned papers in the collection I had - map of my heart, moments and jumble stitch - and also the fabulous die cuts. I cut some *I think 10* circles from these papers, scrunched them up for some added texture and then machine stitched them to my layout. I really wanted my stitching to be a little free & easy, however... I can be more than a little particular about straightness & evenness. So as you can imagine, haphazard stitching is a real challenge for me. But I gave it a go. 7 circles were added to the layers under the photo and 3 were added to the bottom right corner of the layout.


Time to finish it up. I attached a block from the jumble stitch paper to a kraft tag for my journalling. And then it was the pretty bits... Freckled Fawn arrow paperclip & wood veneer, Amy Tangerine foam word, MME enamel dot from the Cut & Paste collection and more of the great Amy Tangerine die cuts.


Products: Paper - Amy Tangerine Stitched; Die cuts - Amy Tangerine; paper clip & wood veneer - Freckled Fawn; thickers - Amy Tangerine; enamel dot - My Mind's Eye; Tim Holtz mini attacher, machine stitching, gesso, watercolour paints, Faber-Castell Gelatos

Saturday, 7 February 2015

Documenting December: Days 18-25

This is it! I'm FINALLY blogging the last of my December Daily album. I finished about a month ago but haven't managed to get around to putting it up on the blog... mainly due to that little thing called life! But today I.AM.DOING.IT! 

And I'm doing 8 days in one post so WARNING - it's going to be photo heavy - especially since we had 2 Christmas days in that time. 

A quick refresher - I was a part of the fabulous DT Documenting December for The Stamp Spot. Michelle created some gorgeous kits for this project and I used the main (gold, kraft & white) kit and also purchased the teal and red add on kits. 

And for those that have stumbled across this post and are wondering what the heck is December Daily - well, it's a concept created by Ali Edwards with the idea being to create a special, usually mini, album dedicated to capturing the spirit of your Christmas - including traditions, special events and other memories. Be sure to check out Ali's blog for more info.

Some of my favourite pages are:


Day 19: This page protector started as 2 4x4 pockets and 1 8x2 pocket. Out came my trusty sewing machine to alter the 8x2 pocket into 4 2x2 slots which I filled with sparkly goodness from the kits.  I also machine stitched on the number card to create a triangle shaker pocket - totally inspired by Michelle's kits.


It's Day 20 & Santa has been! What??!!! I hear you ask.  Well, my husband does FIFO and headed to work on the 22nd so a special request was sent to Santa and he very, very kindly agreed to visit us early. Yay!
The balsa wood in the top pocket is from the main kit. I used a tree die cut before gold embossing the outline, adding a star sticker & also drawing gold stars with the gel pen from the kit. 


Day 20 was really, really busy in my album and there was just no pocket space for journalling - even after I added a Heidi Swapp mini memory album for  more photos. So I solved that problem by writing on an acetate sheet with my trusty black sharpie. It took a couple of days for the ink to dry but was worth the wait.


Day 23 - our church held Christmas carols at the local winery. I know... how good is that? Right! I just love this picture of Hannah with her friend singing merrily. Hannah's job was to jingle the bells & Stephanie's was to turn the pages on the singing book - because she's at school already & can read, of course!
In the top left pocket, the foil came as part of the main kit. Again I used the tree die cut and then a star embossing folder. The 'joy' is from Heidi Swapp was cut on my Silhouette from gold foil paper. 


Day 25 - the standard day is here. No, Santa didn't visit twice, much to the kids disappointment. He did however swing past to collect our elf and also to leave a lovely letter for the kids. However, the day was not without presents. We celebrate lunch & dinner at my sister's and there were kids, gifts & food galore.
I used my trusty Silhouette again to cut the 25 from gold foil card. I created a flip card to record my journalling.


The finish... Being my first year of December Daily I wasn't quite sure just how to finish up my album. Day 25 is my last day and the last pocket is a reminder of everyone's favourite memory for December. They are all different and interestingly enough, neither of the kids actually listed presents.
This final card uses washi, stickers & a flair from the main & teal kits. I also added a gold foil heart die cut.

Now for the other pages:


Thanks so much for stopping by. If you did a DD album for 2014 I hope you too have been able to finish it.

Cheers,


Sunday, 7 December 2014

Day 6 - Documenting December

No, you're not mis-reading, I haven't yet done my day 5 blogpost.  That will be tomorrow.  Things have been a little hectic, as December can be.  Adding in a family birthday and I've also just been diagnosed (yesterday) with shingles.  I'm less than enthused with this, as you can well imagine.  I'm grateful that so far I don't seem to be suffering to badly with it {itchy as all get out though}.  I'm also exceptionally grateful that my wonderful husband is currently home from work.  Small blessings.

I'm part of the DT group with The Stamp Spot and am using the main, teal and red kits from The Stamp Spot {which are truly stunning} to create my December Daily album. Today I've added in stamps and a few extras bits from my stash. 

Ok, so day 6 in my album starts with my sneaky 4x4 page protector. I created this as part of my foundation pages and I still love this page.


The base is vellum with gorgeous teal dots.  I've added a doily, stickers, star sequin, tag from the main kit. Twine and enamel dots are from the teal kit and the number is from the Freckled Fawn very merry embellishment kit.


The next page is a full 6x8 with a red glitter base and white card on top.  I have used washi & stickers from the kits for the title.  As well as my new Wink of Stella red & gold pens. I'm already a little bit partial to these, though I really need to work on my doodling. This page is all about my shingles - woohoo!


Turn it over and there are birthday celebrations for John's uncle.  I've used a white card base, added photos, stamps, watercolour script writing and sequins.  Pretty simple, but looks like a party.


The shaker pocket on this page is from the red kit, handmade by the lovely Michelle.  To this I added washi and stickers from the kits. The journalling pocket is white card stamped with red stars.  The kraft tag has washi and ribbon from the kit.  I have used my sewing machine to attach the tag to the card. There are also a couple of pearls which I have coloured with a gold marker. The fabulous Beth Patfull, one of the other awesome DT members, did a very similar pocket which I absolutely loved.

And this is how it looks in my album:


Thanks so much for stopping my.  Day 5 will come tomorrow, I promise.

If you are after more inspiration, please check out Michelle at The Stamp Spot and also the other awesome DT members:


Amanda Miller

You can find me on instagram as @gabby_ingo and I'll also be linking up with Ali Edwards December Daily posts on her blog.

Have a great day,